Whether you’re camping at an RV park, operating Parks on the Air (POTA), or setting up a temporary station at your campsite, an End-Fed Half-Wave (EFHW) antenna can be a practical HF antenna for RV travel.
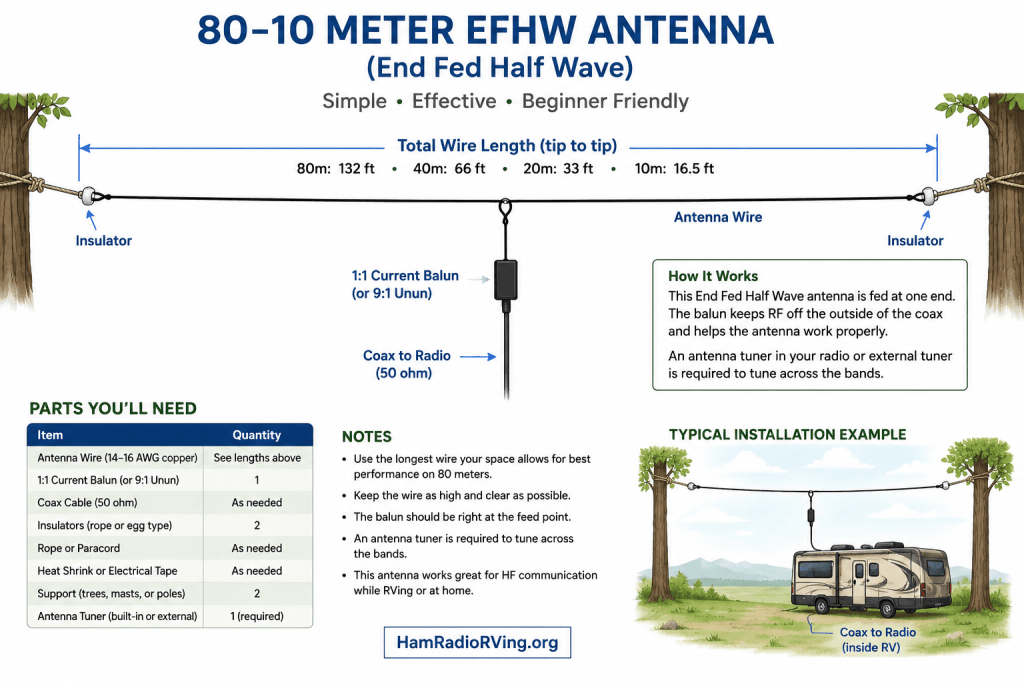
This beginner’s guide will show you how to build an 80–10 meter EFHW antenna, including the parts you’ll need, basic assembly, installation ideas for RVers, and tips for getting it on the air.
What You’ll Need
Basic Parts List
1. 49:1 EFHW Transformer (Unun)
The 49:1 transformer connects your coax feed line to the end-fed antenna wire and provides the impedance transformation needed for an EFHW antenna.
2. Antenna Wire
Use approximately 130–135 feet of stranded, insulated copper wire. 14- or 16-gauge wire works well for a permanent or semi-permanent RV setup.
3. Coax Feed Line
Use 25–50 feet of 50-ohm coax such as RG-8X. RG-8X is a good choice for an RV station because it is flexible and easier to store than heavier coax.
4. End Insulator
Use a small antenna insulator at the far end of the wire. This gives you a secure attachment point for support rope without putting stress directly on the antenna wire.
5. Support Rope
Use lightweight, weather-resistant rope or paracord to support the far end of the antenna. Carry 50–100 feet so you have enough length for trees, poles, or other safe supports at a campsite.
6. Antenna Analyzer or SWR Meter
Use an antenna analyzer or SWR meter to check the antenna before transmitting. This helps you find the resonant frequencies and make any needed adjustments safely.
7. Optional Antenna Tuner
An antenna tuner can help your radio match the antenna on bands where the SWR is not low enough. Many modern HF radios have a built-in tuner, so check your radio before buying a separate one.
8. Basic Hand Tools
You’ll need wire cutters, wire strippers, pliers, a tape measure, and basic tools for attaching the wire and coax connections.
How to Build the 80–10 Meter EFHW Antenna
Step 1: Measure and Cut the Antenna Wire
Start with approximately 135 feet of insulated stranded wire. This gives you a little extra length for attaching the wire to the transformer and for final tuning.
Do not make the final trim yet. We will shorten the wire gradually when we tune the antenna.
Step 2: Connect the Wire to the 49:1 Transformer
Connect one end of the antenna wire to the antenna-wire terminal on the 49:1 transformer. Make sure the connection is tight and secure.
Step 3: Attach the End Insulator
Attach an end insulator to the far end of the antenna wire. Secure the wire so it cannot pull loose, but leave a little extra wire available for final tuning.
Step 4: Attach the Support Rope
Tie the support rope or paracord to the end insulator. The rope supports the antenna and keeps the antenna wire itself from being tied directly to a tree, pole, or other support.
Step 5: Connect the Coax
Connect your 50-ohm coax cable to the coax connector on the 49:1 transformer. Run the other end of the coax toward your radio, keeping it out of walkways where possible.
Step 6: Raise the Antenna
Raise the antenna as high and as safely as practical. You can install it as a sloper, inverted-L, or mostly horizontal wire depending on your campsite. Keep the wire well away from power lines.
Step 7: Check the SWR
Connect an antenna analyzer or SWR meter and check the antenna on each band you plan to use. Start with low power and do not transmit at full power until the SWR is acceptable.
Step 8: Tune the Antenna
If the antenna is too long, trim only a small amount of wire at a time. Recheck the SWR after every adjustment. It is much easier to remove more wire than to put wire back on.
Step 9: Test Each Band
Check the SWR on 80, 40, 20, 15, and 10 meters. An EFHW can operate on several harmonically related bands, but an antenna tuner may be needed on some frequencies.
Step 10: Make Your First Contact
Once the SWR is acceptable, connect the antenna to your HF radio and begin with low power. Listen for activity, choose a clear frequency, and make your first contact with your new 80–10 meter EFHW antenna.
RV & Campsite Safety
Never install an antenna near overhead power lines. Keep the antenna, support rope, and coax away from roads, campsite walkways, neighboring RV sites, and areas where people could trip over them. Always follow campground rules before attaching anything to trees or other campground property. Lower the antenna during severe weather or high winds.
Antenna Setup Options for RVers
At a campsite, an EFHW can be installed several ways depending on the space available. Common setups include a sloper from a telescoping mast, an inverted-L, or a mostly horizontal wire between safe supports.
Final Setup Check
Before operating, inspect all connections, make sure the antenna and support ropes are secure, check the SWR, and confirm that the antenna is safely clear of people, vehicles, and power lines.
Operating Your EFHW Antenna
Once your antenna is installed and the SWR has been checked, you’re ready to get on the air. Start with low power and listen before transmitting. Check the band for activity, identify with your call sign, and enjoy making contacts from your campsite or RV.
Final Thoughts
An 80–10 meter EFHW antenna can be an excellent choice for RVers because it is simple, lightweight, and easy to deploy at a campsite. With a 49:1 transformer, the right length of wire, and a little careful tuning, you can build a versatile HF antenna that travels easily with your RV.
As you gain experience, experiment with different antenna configurations and heights to find what works best for your RV setup and the campsites you visit. The goal is a safe, reliable antenna system that is easy to set up, take down, and enjoy wherever the road takes you.
Amazon Affiliate Disclosure
As an Amazon Associate, HamRadioRVing.org earns from qualifying purchases.

